The Regiment
"Not for fame or reward, not for place or for rank, not lured by ambition, or goaded by necessity, but in simple obedience to duty as they understood it, these men suffered all, sacraficed all, dared all.... and died."
- Randolph Harrison McKim
"To be forgotten - that is what I most dread. Never to have happened would not matter, but to have happened, to have walked the world, laughed, loved, created and then be treated as though we had never lived, there lies the sting of death"
- Diary of a Boer War soldier
 Fulwood Barracks was the place to be on November 30th 1899 !!
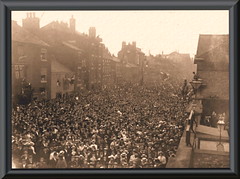
 The excitement was palpable as the 1st Battalion South Lancs had at last been ordered to join Buller's Army! Some 650 former soldiers of the Regiment were mobilised to bring the Battalion up to strength - the barracks were overflowing with over 1100 officers and men ...... Many were just young kids - naive youngsters who were soon to know the full horror and reality of war - The band of the 1st Volunteer Battalion Loyal North Lancs left first - followed by a contingent of South Lancs who started to march - led by Colonel MacCarthy O'Leary and his staff. North and East Lancs Regiments were next then a second contingent of South Lancs - men commanded by Major Hall - they were cheered loudly by the men left behind and the wives and children and their families Finally the last contingent left - the final company - the streets were lined with enthusiastic men women and children - all shouting and crying and waving flags and hankies. Flags were hanging from windows and lamp posts - and the frenzy of the people continued all the way to the railway station - passing shops all done up with buntings and flags. The soldiers were laughing and shouting at the crowd and found time to kiss as many girls as possible!!
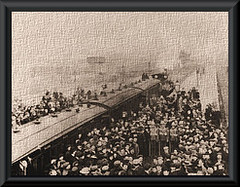 The singing of the National Anthem and Soldiers of the Queen followed the men as they marched all along the route to the station - but then the time came to depart and there was much kissing and clinging and weeping - in the end the men marched to the trains and the trains pulled out for Liverpool amidst cheers and much flag waving. All the way to Liverpool - the crowds gathered all the way along the route to wave and cheer as the troop trains passed In Liverpool - the men marched to the Alexander Dock embarkation shed to board SS Canada - there were so many people trying to say their last Goodbyes that the police had to be called to restore order! The SS Canada sailed December 1st 1899 bound for the Cape!!!! As they pulled out into the Mersey - the Liverpool dockers lined up along the dock and sang Auld Lang Syne - there was not a dry eye anywhere!!!! On December 20th the SS Canada anchored in Table Bay and on the 23rd - they disembarked at Durban and boarded a train for Estcourt - where they pitched camp - on Christmas Day - there was a church parade and then dinner of wild bullock - and a terrific rainstorm - So the Battalion was in the land of the Boer War - what was their future ?
 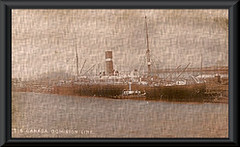 War was not a new thing to the people of Natal, for they had been part of The Zulu Wars of 1879 and the First Anglo Boer War of 1880/81. Second Boer War, also known as the South African War was declared on October 12, 1899 and the Boers struck first by invading Cape Colony and Natal Colony between October 1899 and January 1900. This was followed by some early Afrikaner military successes against General Redvers Buller. The Boers were able to besiege the towns of Ladysmith, Mafeking (defended by troops headed by Robert Baden-Powell), and Kimberley.
General Buller landed in South Africa on the 30th October 1899 and the Relief of Ladysmith had begun. The total number of British troops in South Africa was the greatest ever assembled in the southern hemisphere, a record that lasted until the Falklands War some 80 years later. Buller divided his force for the Free State, Kimberley and Natal campaigns leading the latter personally. In this Natal campaign there were four attempts to relieve Ladysmith through the battles of Colenso, Spionkop, Vaalkrantz and the Breakthrough. The Siege of Ladysmith began on 2nd November 1899 with the cutting of the railway and telegraph lines and lasted for 118 days. The population, including military and civilian, was over 20000. General Sir George White commanded the besieged forces in Ladysmith whilst the leadership of the besieging force fell to Piet Joubert. Several battles and sorties took place, among them Rietfontein, Ladysmith and Platrand. From the start the Boers approached the engagement with enthusiasm and sent their shells into the town with fierce regularity - 300 per day - six days a week was not unusual.
By 11th December 1899 Buller was ready to attack Colenso. It was a total disaster resulting in very heavy losses for the British and triumph for the Boers. Buller pulled back to Frere - only to hear of more disasters at Magersfontein and Stormberg. This period becomes known as Black Week and was the source of great consternation to him. Sending a telegram to the War Office in London - he asked to be relieved of his post - only to be ordered to stay where he was and await the arrival of Lord Roberts to take overall command in South Africa - even with a well-organized staff, with highly-trained, purposeful subordinates, with a common tradition of military method ingrained in the whole force - no General - however unequal to his position, could have done the things that Buller did. But the environment which made Buller what he was - also made those who served under himHis failings were also their failings. The lack of strategical or tactical insight, the indifference to organization and to the securing of information, the slowness, the irresolution, the absence of any real fighting instinct, the fear of bold, far-reaching decisions, these were defects which, in varying degrees, showed themselves in almost every senior officer who took the field during the war. Buller, indeed, combined all these defects - for that reason he will always remain the typical embodiment of the British military system of his day - as tested in its first contact with the hard reality of war.  That the test did not result even more grievously - that Buller did at last break his way through to Ladysmith - was due to two causes - to the weakness of his adversaries, and, above all, to the fundamental soundness of the material of which his army was composed. The deficiencies of the British regimental officer - and of the men whom he led, were many - but their deficiencies were, after all, completely overshadowed by their virtues - and it was those virtues that - in the end - broke the Boer resistance and relieved Ladysmith. Their fearless courage, their patient endurance, their imperturbable cheerfulness in defeat, their unquestioning loyalty to their leader, lend dignity and pathos to a story - most of which would otherwise be profoundly depressing, and gave a sure hope of better things. If there is one clear lesson we may draw from the Tugela campaign, it is that British soldiers, trained as they might be trained, and led with courage and science can match themselves with any army in the world.
On the 6th January Piet Joubert came as close as the Boers ever would - to capturing the town - when they attacked the southern defences of Platrand through two simultaneous battles at Caesar's Camp and Wagon Hill. Casualties were high on both sides but British discipline and the shortage of Boers gave the defenders the winning edge.
 Siege life took its toll - on both the defending soldiers and the civilians in the cities of Mafeking, Ladysmith, and Kimberley as food began to grow scarce after a few weeks. The cities under siege also dealt with constant artillery bombardment, making the streets a dangerous place. Near the end of the siege of Kimberley, it was expected that the Boers would intensify their bombardment, so a notice was displayed encouraging people to go down into the mines for protection
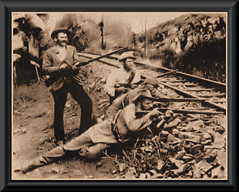
In January the relief force moved to Springfield about 35 kilometres as the crow flies to the west of Colenso. On the 24th Buller again takes on the Boers at Spioenkop with more disastrous results. The British soldiers were from the Second Battalion Lancashire Fusiliers, the Second Battalion of the Royal Lancaster Regiment and the First Battalion of the South Lancashire Regiment. Capturing Spionkop meant that the British Army could relieve their countrymen besieged by the Boers in the Natal town of Ladysmith and be home by Christmas - they decided to assault Spion Kop on the night of 23 - 24 January - they assembled at 7.30pm on the 23rd - Lieutenant Frederick Raphael was near the back of the column - it was misty and drizzling rain as they marched in silence not knowing where they were going ..... knowing only that they were heading towards enemy lines - they crept on until they reached Spion Kop - that's when they realised what was about to happen- they were surrounded by thick fog and out of the fog they were confronted by a Boer sentry - they killed him and ran screaming along the flat top - only to find they were alone - the Boers had left! The fog was still swirling around them but they thought that they had captured the position -
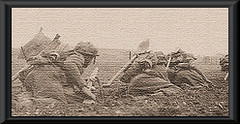 they started to dig trenches but the ground was so hard they weren't able to dig anymore than a shallow troughs - suddenly through the fog there was a hail of bullets - nobody knew where they were coming from - all they could do was wait for the fog to lift - the terrible miscalculation of their actual position was to prove costly. How the Major-General had lost track of the various false horizons was not recorded, but it was all too clear in the blistering light of day that things were wrong - By 8 o'clock the fog lifted and to their dismay they discovered that they were at the top of the hill without guns - in full view of the enemy - Bullets were flying everywhere - men were dying and wounded and they were helpless ..... By 9 o'clock General Woodgate had been fatally wounded - Captain Mickey Lynch and Sergeant Price of the South Lancs led eight of their men forward - to cover the General's evacuation - a little later Captain Charles Birch - sheltering from heavy fire was shot through the head - Lieutenant Frederick Raphael took over - but two hours later he was killed also - shot by a shell while trying to rescue a wounded man - Captain Edward Oakley watched the struggle through glasses - suddenly reinforcements arrived - only just in time - as there were more Boers on the horizon - Captain Oakley was worried and he had a right to be - the Commanding Officers were alarmingly confused having crossed communications - By noon the troops were at the end of their tether - morale was low - and in the confusion were being called on to surrender by the Boers - but would not admit defeat and they held their position - when darkness came the men were so tired and demoralised - they were hungry but still they carried the wounded to the field hospital - By 11pm the re - enforcements came - but much too late - what they didn't know was that the Boers had evacuated the Spion Kop too! South Lancs casualties that day were - two officers two sergeants and seven men killed in action or died of wounds and thirty men wounded or missing
 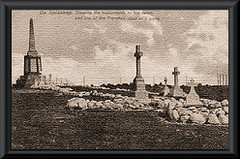 There was a truce for two days while the men were buried! February saw the Battle of Wynne's Hill - the fighting on the 23rd had cost the South Lancs 24 more wounded including Major Reginald Hall - Captain Berkley Goren - Captain Stuart Upperton and 2nd Lieutenant Cunliffe Marsh - the battalion was relieved on the night of the 23rd and they moved the next day - crossing the bridge to Hlandwane for a rest and on the 26th they marched to a place were they could take a bath and wash their clothes!! Morale was high again!
On the morning of 27th February - Colonel Kitchener ( brother of Lord Kitchener) gave the word. General Buller had decided to assault Pieters Hill - In the afternoon the Boers were pouring it on - and the South Lancs in a great wave of khaki surged up the steep hill-side, the guns keeping up their fire in front of them to the last and swept on to the summit. At the same moment Kitchener at last - let slip the South Lancashires, whose Colonel, McCarthy O'Leary, had for the last half hour been straining desperately at the leash. Up leapt the South Lancashires, and in one wild, glorious rush raced for the great trench, which ran along the level between Eailway and Inniskilling Hills - MacCarthy O'Leary shouted " Fix bayonets - prepare to charge " and then he said
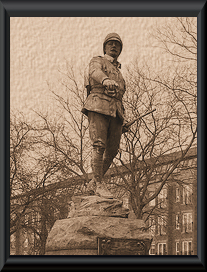 "Remember men - the eyes of Lancashire are watching you today!!" - then never checking once, or even pausing for breath, they swept over the broken ground and were into the trench their gallant and impetuous Colonel falling as they reached it - before the Boers had time to run away - the old 40th swept on, but MacCarthy O'Leary's dead body marked the way which they had taken. A few of the Boers were bayoneted; some 50 or 60 were made prisoners. Meanwhile at the very moment of the assault - the Johannesburgers on Railway Hill had been reinforced by a contingent of their own commando, summoned in hot haste from the Upper Tugela. As the West Yorks, now joined by some of the South Lancashires, pushed across the summit - they met with a heavy fire from the far side. But they were not to be stopped and swept right over the top, capturing a maxim and several prisoners. Then manning the Boer guns they poured a heavy fire after their retreating enemies (5 pm ). The Royal Lancasters had further to go, and had not drawn level when the assault was delivered. Their two leading companies had only one officer each - both had already been wounded, and, for want of leading, the attack hung fire.
 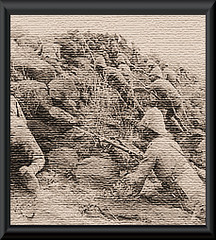 But, seeing their comrades on the right charging home, the men would not be denied, and sprang forward. As they did so they came under heavy fire from Inniskilling Hill, which was much nearer to them. Ignorant or forgetful of their proper objective, or perhaps realizing that Pieters Hill was already practically won, some 50 or 60 of them turned to their left, and charged straight up the steep slope to the summit, killing and capturing a few of the enemy, and securing a position on the crest, whence they brought a cross fire to bear on the Boers in the main trench, now fully busy with the assault of Norcott's battalions - Several South Lancs men were hit - Major Thomas Lamb lost an eye - 2nd Lieutenant Marsh took over the company and was awarded the DSO for Gallantry apart from the Colonel - the South Lancs lost a sergeant and four men killed - an officer and thirty four NCO's and men wounded of which four died At the Battle of Paardeberg on February 18-27, 1900 Lord Roberts finally defeated the Boers and was able to force the surrender of General Piet Cronje where he and 4,000 of his men were captured - which further weakened the Boer fighting force and led the way for the Relief of Ladysmith the following day.
[The first sizable batch of Boer prisoners of war taken by the British consisted of those captured at the battle of Elandslaagte on October 21, 1899. At first many were put on ships. But as numbers grew, the British decided they didn't want them kept locally. The capture of 400 POWs in February 1900 was a key event, which made the British realize they could not accommodate all POWs in South Africa. The British feared they could be freed by sympathetic locals. They already had trouble supplying their own troops in South Africa, and didn't want the added burden of sending supplies for the POWs. So, Britain chose to send many POWs overseas. The first overseas (off African mainland) camps were opened in Saint Helena, which ultimately received about 5000 POWs. About 5000 POWs were sent to Ceylon (Sri Lanka). Other POWs were sent to Bermuda, and India. Some POWs were even sent outside the British Empire, with 1443 Boers (mostly POWs) sent to Portugal.] The Breakthrough is an approach made east of Colenso, crossing the Tugela and on through Pieters, reaching Ladysmith on the 1st March 1900. The Boers had lost some five hundred in killed, wounded, and prisoners It seemed to the British General and his men that one more action would bring them safely into Ladysmith. The Relief of Mafeking on May 18, 1900 provoked riotous celebrations in England.
 The British then advanced into the two republics, capturing the capital of the Orange Free State, Bloemfontein on March 13 and the Transvaal capital, Pretoria, on June 5. British observers believed the war to be all but over after the capture of the two capital cities. However, the Boers met at a new capital, Kroonstad, and planned a guerrilla campaign to hit the British supply and communication lines. The first engagement of this new form of warfare was at Sanna's Post on March 31 where 1,500 Boers under the command of Christian De Wet attacked Bloemfontein waterworks about 23 miles east of the city, and ambushed a heavily escorted convoy which resulted in 155 British casualties and with seven guns, 117 wagons and 428 British troops captured. One of the last formal battles was at Diamond Hill on June 11-12, where Lord Roberts attempted to drive the remnants of the Boer field army beyond striking distance of Pretoria. Although Roberts drove off the Boers from the hill - the Boer commander, Louis Botha, did not regard it as a defeat, for he inflicted more casualties on the British (totalling 162 men) while suffering around 50 casualties. This battle ended formal military operations and set the stage for the new phase of the war
 Guerrilla war - September 1900 until May 1902 - By September 1900 the British were in control of both Republics, except for the northern part of Transvaal. They however found that they only controlled the ground their columns physically occupied. As soon as the columns left a town or district - the control the British had there, faded away. The huge territory of the Republics made it impossible for the 250 000 British troops to control it effectively. The vast distances between the columns allowed the Boer commandos considerable freedom to move about. The Boer commanders also decided to adopt a guerrilla style of warfare. The commandos were sent to their own districts with the order to act against the British there whenever possible. Their strategy was to do as much damage to the enemy as possible, and then to move off and vanish when enemy reinforcements arrived. The Boer commandos in the Western Transvaal were very active after September 1901. Several battles of importance were fought here between September 1901 and March 1902. At Moedwil on 30 September 1901 and again at Driefontein on 24h October General De la Rey's forces attacked the British but were forced to withdraw after the British offered strong resistance A time of relative quiet descended thereafter on the western Transvaal. February 1902 saw the next major battle in that region. On 25 February De la Rey attacked a British column at Ysterspruit near Wolmaranstad. De la Rey succeeded in capturing the column and a large amount of ammunition - enough to last his commando a long time.
The Boer attacks prompted Lord Methuen, the British second in command after Lord Kitchener, to move his column from Vryburg to Klerksdorp to deal with De la Rey. On the morning of 7 March 1902 the Boers attacked the rear guard of Methuen's moving column at Tweebosch. In the confusion that soon reigned in British ranks, Methuen was wounded and captured by the Boers. The battle of Tweebosch was one of the De la Rey's finest victories.
The Boer victories in the west led to stronger action by the British. In the second half of March 1902 - large British reinforcements were sent to the Western Transvaal.The opportunity the British waited for, arose on 11 April 1902 at Rooiwal where the combined forces of Generals Grenfell, Kekewich and Von Donop came into contact with the forces of General Kemp. The British soldiers were superbly positioned on the mountain side and mowed down the Boers charging on horseback over a large distance, beating them back with heavy casualties.. This was the end of the war in the Western Transvaal and also the last major battle of the Anglo-Boer War. The last of the Boers surrendered in May 1902 and the war ended with the Treaty of Vereeniging in the same month.The Treaty of Vereeniging specified that the Boers would - end hostilities - Surrender their independence - Recognize the authority of Edward VII. For their part the British agreed to - The repatriation of the prisoners of war. A general amnesty with a few exceptions.Limited protection of the Dutch language in the courts. Various economic safeguards such as the maintenance of property rights. Honouring of the republican war debt to a sum of 3 million pounds Generous relief for the victims of war. Promise of eventual self-government and an agreement that no decision would be taken regarding the franchise of black people until after the introduction of responsible government 22,000 British troops had died and over 25,000 Boer civilians. The treaty ended the existence of the Transvaal and the Orange Free State as Boer republics and placed them within the British Empire. But the Boers were given 3 million pounds in compensation and were promised self-government in time (the Union of South Africa was established in 1910).With the signing of this Treaty, the bloodiest war ever fought on South African soil had ended. The Boers were defeated and the two former Republics were incorporated into the British empire as crown colonies. The cherished British ideal of a united South Africa thus started - it was realised on 31 May 1910 with the establishment of the Union of South Africa. This Honour Roll is in loving and proud memory of my Grandfather and my Father who both served with the Prince of Wales Volunteers. This work has been an incredible journey of research and discovery! I must give credit to the Great War Forum for all their help and attention - RootsChat and Ken - and also thanks especially to Mack and Rick and Kev for all their encouragement and patience !